Wednesday, February 29, 2012

Chalkboard Beer Flight Paddles


For Christmas, I bought my husband a set of beer flight paddles and tasting glasses.  I will admit, it was one of those gifts that was sort of for me as well.  He is a homebrewer and has converted me to a beer lover.  The idea of being able to try several different types in a small amount is really fun to me.  I love it when we're visiting a new city and a restaurant or bar will offer a local beer flight.


I bought the wood paddles and glasses through The WEBstaurant Store.  You have to buy a large quantity, so you might want to go in with a friend or split them up as gifts.  I've seen them in smaller quantities other places, but it was much cheaper to buy a few more.  I figure it will be fun at parties to have a bunch.

Whenever we have people over, they always want to try out his beer.  I thought it would be fun to have some flight paddles so people could sample a few types.  It's hard to keep track of the different types and figure out what you like, especially if you're not an experienced beer aficionado.  So, chalkboard paint seemed like a logical choice for labeling the beer.


I put a thin coat of primer on the very top of the paddles.


After that dried, I added two coats of chalkboard paint.  Following the directions, I let it cure for three days before I seasoned it with chalk and started writing on them.


Simple and easy--my kind of project.


I used a chalk marker to write on these.  I find that's it easier when you're working with a small space.


These were already poured, so I had to drink them.  You can't let beer go to waste!  Can you tell which one was my favorite?  Flat 12 Half Cycle IPA is where it's at!

Monday, February 20, 2012

Richlite Countertops - Part 2

After we installed our Richlite countertops in our kitchen, we were deep in the midst of moving in and getting settled.  We actually waited a couple of weeks before we oiled the countertops to finish them.  You can read about our installation process here.


This is what the Richlite looked like at this point.  After the installation, my husband sanded the countertops again with the orbital sander.  They were much smoother now than when they first arrived.  It had been used for a couple of weeks and you can see the markings and discolorations on it.  We scrubbed it with warm, soapy water, rinsed everything, and let it dry well.


We used Bioshield Wood Counter Finish to oil the countertops.  It is a combination of a few different oils and can be used on a variety of kitchen surfaces.  We bought ours from Amazon and just spread it on with a clean paintbrush.


The change in color was immediate and dramatic.  You could tell some of the oil was being absorbed almost immediately.


We left it like this overnight to let the oil soak in.


The next morning, the shiny, wet look was gone.  It still looked a little oily, but most of the oil was dry.  You can see that the discolorations and chalkiness are gone.  The color deepened to a rich brown color.


We used paper towels to wipe it all down and remove any excess oil.  I love how the color variation almost makes it look like there is a texture, but it's smooth and reminds me of leather.

Fast forward one month:  The countertops still look really good.  We haven't re-oiled them yet, but I'm guessing that we will in the next month or so.


The color is still very dark, but it doesn't always look brown.  Depending on the light, it can look charcoal or even black.  I'm still happy that we chose the Chocolate Glacier color rather than black.  It's nice to have something a bit unusual.


We know that these countertops will get scratched and worn...and that's okay.  It fits with our house and we like the potential patina that the Richlite offers.  If you get a really bad scratch, you can sand the countertop and then re-oil.  While we haven't had any really bad scratches since installation, all of the scratches and scuffs that were present upon arrival sanded out just fine.


We did have a few small scratches in this area.  I'm still not sure how they got there. They looked whitish and you could feel them with your hand.  I dipped a paper towel in some canola oil that was sitting on the counter and started rubbing it on the area.  They're still there, but you don't notice them unless you look for them.  (Very bottom of the picture, left of the center)


I had a few people ask me about the edge of the countertops.  Did the cut edge look different, does it feel different from the top, etc.  Obviously, we went for a very basic, plain edge.  We didn't try any kind of bevel or rounding.  Once we sanded and oiled them, there was no noticeable difference between the edge and the top.  We applied oil to the edge, just like we did the top surface.

Almost everyone who walks into our kitchen for the first time lays their hand on the countertops and then asks "What kind of countertops are these???"  The look on their face when you tell them it's recycled paper is hilarious.  You would never guess it by looking at them or touching them!

Sunday, February 19, 2012

Richlite Countertops - Part 1

In our search for the right countertop material for our kitchen, we quickly got frustrated with the available options.  We liked the look of honed granite, soapstone, and concrete.  We simply couldn't justify the price of the granite or soapstone, knowing we could spend that money somewhere else in the house.  We were scared of the weight of concrete countertops, as we would be covering a large area and we just weren't too sure how much weight would be safe.  We started looking into less popular options and ran across Paperstone and Richlite, both eco-friendly options, which we liked.

Unfortunately, we had a lot of trouble finding anyone local who was selling either product.  There weren't a lot of online reviews about them, either.  We finally tracked down the owner of a green building supply shop that had recently closed.  He let us into his warehouse one Saturday and we dug through boxes until we found some samples of the products.  It wasn't a lot to go on, but it was somewhat reassuring to finally have something you could actually touch instead of just looking at pictures on a website.

Both products are very similiar, but we decided that we preferred the feel of the Richlite and the color variation that it offered.  We knew we wanted a darker color and the black Paperstone seemed almost rubbery.  We eventually bit the bullet and decided on the Richlite in Chocolate Glacier.  You can read the details on the company website, but Richlite is basically paper that is mixed with resin to create the countertop material.  It cuts similar to MDF and you can route the edge for a decorative finish, if you wish.  The price was much more reasonable than granite or soapstone and the fact that we could cut it and install it ourselves was very appealing.

Even though things were looking up and we felt good about our decision, you should know that there are some additional challenges we faced with the Richlite.  The availability was difficult for us, as we didn't have a local dealer.  We had to order direct from the manufacturer.  Because we aren't certified installers, we had to pay about $100 for a training guide that explained how to work with the product.  They seem to be most concerned with the seaming process.  We had to seam together two small pieces of Richlite and send them back in to the manufacturer, in order to show that we weren't going to make their product look junky.  :)  We also had to purchase special saw blades for the product and it wasn't exactly as easy to cut as regular ol' MDF.  Still for the price and look that it gave us, we would do it again!


The Richlite arrived in very large slabs.  We had some choices on the sizes that were available, so we tried to get pieces that would work for our space with as few seams as possible.  I admit, when it first arrived, it was kind of scary.  It looks very chalky and dull with a lot of scratches and imperfections.  But, I just kept reminding myself that it would look better once it was in and we sanded and oiled it.  Just to be clear, we knew from the beginning that it WOULD scratch and develop a worn patina.  We were 100% okay with that.  It just takes some getting used to when it's very different from your typical countertop.


After lots and lots of careful measurements, we cut out cardboard templates to fit on top of our kitchen cabinets.  Those were carefully taped on and we got ready to start cutting out for the stove and sink.


We used blue painter's tape to help keep a smooth, straight line.  Notice my father in law's mask.  This stuff puts off A LOT of nasty dust when cut and sanded.  You definitely need a mask and I recommend doing this outside, if possible.  Make sure you use a new, sharp saw blade and if you're cutting a lot, you may need to have an extra on hand.  It dulled our blades fairly quickly.


After a thorough sanding to smooth everything out, we started laying it in place.


The area that you're looking at in this photo is the only big seam we had to contend with.  We were able to match the others up with our stove, so it wasn't very noticeable.  We opted to just keep our seam perpendicular, rather than at a 45 degree angle.  It works out well in this small corner and there was no need to make it more complicated.

You'll notice that it really doesn't look very brown in these pictures.  I'll share more photos in the next post that show the countertop after it has been oiled.  The color darkens and becomes much richer.  Check back in to see how it all turns out!

Saturday, February 11, 2012

Moving Announcement

Just thought I would share a quick picture of our moving announcement.  We sent these out recently with our new address.


A while back, a friend from college sent out moving announcements with a picture of her son in a moving box and I knew that I would be stealing borrowing that idea in the future.  I loaded up the girls in a big moving box and I originally wanted Ryan to push them with the hand cart, but that was a little scary, so we just left them in the box.  I added the text in Picnik, and voila!  Easy peasy.

I had them printed in a square size from Mpix and tucked them into solid colored envelopes from Hobby Lobby.  Our return address stamp is from Stamp it Out

I always like to get these in the mail so that I have a new address when it comes time to mail a birthday or Christmas card.  Have you done anything creative with moving announcements/change of address cards?

Friday, February 10, 2012

Preschool Career Day

A few days ago, my twins came home from preschool and were so excited to tell me about Career Day.  They were supposed to choose what they wanted to be when they grew up and dress accordingly.  I thought I would share their quick costumes for future Halloween ideas.


Madeline quickly decided that she wanted to be a vet.  I admit, I was really excited about this because the girls had received a play vet kit for Christmas, so we had lots of props.  :)


She wanted a "long, white jacket like a doctor", but I convinced her that scrubs would work for a vet.  We found lots of scrubs at Goodwill for $3.99.  I ran an iron-on transfer through the printer to add her full veterinarian name.  The size extra-small top wasn't too bad over some similar colored leggings and a long sleeved t-shirt.


For a finishing touch, I printed out a few fake business cards for her.  She kept them in her pocket and told me that she gave her teacher one before she left. :)


Grace had already decided about her career choice long before I asked her (big surprise).  She told me that she wanted to be "a person who works at the grocery".  I assumed that she meant a cashier, but when I started discussing a cash register, she quickly corrected me that she wanted to be the person who put the food on the shelves.  Dream big, little girl!

I picked up a child size canvas apron at Walmart and used an iron on transfer to make her a grocery store logo.  The apron didn't have pockets, so I just folded up the bottom and stitched the sides and the middle to make some pockets to hold her stock girl accessories.  We added a clip on name tag, a small notebook, some garage sale price tags, and a produce bag that I swiped from Walmart.  She shopped her play kitchen for a grocery basket and a few essentials to carry along.

I wish I had a picture of the whole preschool class.  They all looked pretty cute today!

Tuesday, February 7, 2012

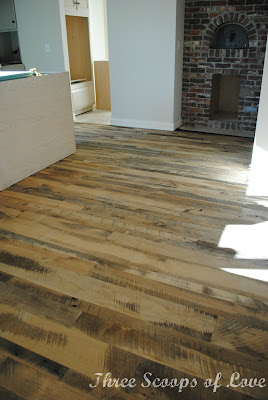
Our Wood Floor

After investigating our options and searching for a wood floor that has a worn, reclaimed look, we decided that we weren't happy with the new products that were meant to look old.  We wanted something with more character that wasn't so uniform looking.

We stalked the Elmwood Reclaimed Timber website for a while, drooling over the choices.  I especially liked their Virtual Showroom that gave you a better idea of what the product might look like in your home.  We finally called and ordered some samples.  They arrived quickly and we began playing with them.  We sanded them and tried out different polyurethane/stain/sealer choices to see how they would look.  We were pretty set on the Reclaimed Barn Wood Flooring in Natural Hardwoods and it didn't hurt that it was in the sale section.  I was still nervous about making this big purchase over the phone/internet without actually seeing the product in person.  The salespeople at Elmwood were very helpful and let me order 10 square feet first.  Once I had that, I set it up in our garage and walked around on it and looked at it in different light to make sure I was in love.  I'm so glad we did that because it really sealed the deal for us.  The wood was a lot rougher than we anticipated, but it just meant that we would be doing some extra sanding to prep the floors.

In early December, we went on a family vacation to Disney World for a week.  The timing worked out that our trim carpenter laid the floor for us while we were gone.  It was a lot of fun to come home to a new wood floor!  He texted us some pics while we were on vacation and it just made me want to see it in person even more!


As soon as we got home, the next order of business was sanding and finishing the floor.  We rented a floor sander and lightly sanded the entire thing.  We vacuumed the worst of the dust and then went back over the extra rough spots.  We didn't want to take too much off the wood.  After all, we wanted a lot of character.  We tried to just knock down the spots that would catch on your socks or were so unlevel that little feet might trip on them.

We then vacuumed A LOT and let the dust settle overnight.


The next morning, we vacuumed again and then went over the floor with a light coat of VM&P Naphtha, at the recommendation of our house painters.  That picked up the remaining dust and residue.


After taping off all the edges, we broke out the floor polyurethane.  We used a brush around the edges and a floor applicator on a handle for the rest.   The key was to use a really light coat.  We used the brush to get down into all of the cracks and crevices.


The initial color change was unbelievable.  This was just floor polyurethane, no stain or color involved.  After the first coat dried, we did a second coat, let it dry, and then spot sanded a few places.  We did a third final coat and we were finished!


 After pulling up all the tape and doing a few touchups here and there, I'm really happy with it.  I know it's not for everyone, but I love it.  It's very rough, as far as floors go, it's uneven, there are knotholes and sawmarks and dents and scratches.  But, I think it's perfect for us.  As my kids drop things on the floor and we put our own wear marks on it, it's only going to add to it's beauty.


It's definitely the first thing people notice when they come in our house.  My girls love to tell people that it used to be a floor in a barn and there were probably animals walking on it.  :)


Friday, February 3, 2012

You + Me on a Tree


We recently had some firewood delivered and it got me thinking about what else I could do with all of that beautiful wood stacked up so neatly on my back porch.


I chose a log that was smaller and had some "prettier" bark with character.  I also liked that this one had a little stump on the side.  I thought it made it look more interesting.  The original log I chose was a little long and not even on the ends, so I cut off both ends with a chop saw.  It's never going to be perfectly straight, but as long as you can get it to stand up, it will work.  I would recommend using a log that is very dry and still has the bark pretty attached.  If the bark is falling off very easily, it will be hard to carve your heart.

I cut a rough heart shape out of paper and laid it on top of the log.  I took an old, rusty utility knife and started scoring around the heart shape.  You can't really cut through the bark, so I just pushed it in as far as I could until I had a series of line cuts all the way around the heart.


Then, I took the utility knife and started chipping away at the bark.  I kept going back and making my heart outline cuts deeper as I went.

I kept going until I had a fairly good heart shape and the layers of bark that I had removed were pretty even. Then, I took a sheet of sandpaper and tried to smooth out the heart surface the best I could.  The smoother your surface, the easier it is to get an even line with your woodburning tool.


I drew out my letters lightly with a pencil and heated up my woodburning tool.  I got this for Christmas and was anxious to try it out.  I had never used one before, so I did a little practice on the ends I cut off the logs.  It was pretty simple, just remember that you can always go back and make it darker, but you can't lighten your lines.


 As you can see, it's not perfect, but that's okay with me.  I went back over my letters several times to try to even it out and clean my lines up.  I also added the dots around the edge for a little border.


Perfect for Valentine's Day, but I think it will live in our bedroom all year long!

{cheese to my macaroni sign was purchased here}