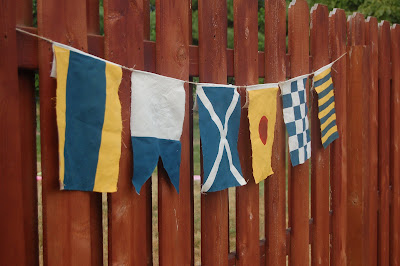
A few months ago, I was browsing through the Land of Nod catalog and I saw these. My wheels starting turning and I figured I could make my own version pretty easily. Even though they are shown in a boy's bedroom and I don't have any boys of my own, I thought they would even be nice for some coastal summertime decor.
If you search for "nautical flag alphabet", you'll find a zillion hits that will show you the symbols for the alphabet that are used on nautical flags. I happened to use this one. I decided to spell out our last name, with the plan to display it on the mantel or in the playroom.
I didn't want to buy anything special for this project, so I used only things that I had on hand.

I started with a bolt of unbleached cotton muslin that my grandma had given me from her stash. I cut rectangles that were approximately 9 1/2" wide and 15" tall. I figured that I wanted the finished flags to be about 12" tall, so I left enough room at the top for folding it over the rope.
I should also mention that I wanted these to look a little messy. I wasn't worried about fraying edges or imperfectly straight lines. I was hoping all of that would add to the character and make them vintage and a little worn.

I marked off the top edge with painter's tape and started sloppily applying my colors in acrylic craft paint. Remember, I wanted it to look rough. I didn't have all of the exact colors I needed, so some not-so-precise color mixing occurred to get some colors that would work.

I continued with my painter's tape, making the patterns and symbols to spell out our last name. For the letter "I", I used a drinking glass to trace a circle and then hand painted the circle. If you're looking at the symbol chart, you may notice that the circle on the "I" symbol should be black. I was bummed out when I planned out my last name and saw that I was only using white, blue, and yellow. I wanted some red in there, so I just used red on this one. :)

Wait for your paint to dry, peel your tape off, and admire your new nautical flags!

Lay out your letters and decide how far apart you want them to be. I also tied small knots on either side of each flag, just for an extra little somethin' somethin'. I ran a small line of hot glue along my twine and folded the top of the muslin over. Of course, you could sew it or do something fancier, but I was trying to keep it simple.
Make sure you leave plenty of length on your rope or twine for tying the ends onto something!

I think this would be super cute in a kid's room, spelling out his or her name. You could also use it for a birthday party or nautical themed shower. It looks like there are also flag symbols for numbers, so you could do a birthdate or wedding date as well. It's kind of fun to think that not everyone would know what the "hidden" message is!
Any other good ideas for how to use this super easy project?

What a great idea and project. Super tutorial! I think I'm going to use this in my little man's room!;) Thanks!
ReplyDeletelove this idea!
ReplyDeleteawesome.
cheryl xox.