Thursday, September 27, 2012

Scrap Wood Photo Display

I'm a little behind on posting my tutorials from the So You Think You're Crafty competition.  I'm going to try to get caught up, so you'll be seeing more tutorials than usual.  The theme for Week 1 was Stash Busting.  I decided to use up some of my stash of scrap wood that was hanging out in our backyard.  My husband kept trying to move some of it to the burn pile and I kept rescuing it because I knew I would need it eventually.


I chose a few pieces and trimmed some up so they would be close to the same length.  I didn't want everything exact, because I was going to distress everything to make it look old.  I laid out my pieces how I thought I wanted them (although this would change later).

 I enlisted my trusty helper to assist me with the distressing process.  We banged on the boards with all kinds of different tools.  I also added some nail holes and cut into some of the ends with a hand saw.

 I had seen lots of people rave about using steel wool soaked in vinegar to age wood, so I decided to give it a try.  On this piece of scrap, I was testing out white vinegar on the left, apple cider vinegar in the middle, and balsamic vinegar on the right.  I wanted my boards to look different, so I decided to just use all three on the different boards.


After everything dried, I laid my pieces back out and decided to remove one of the boards to make the sign a little smaller.

 I added two pieces of wood to the back to hold everything together.

I printed out my text to the size I wanted and taped everything together.

I used my favorite transfer method of scribbling with pencil on the back and then tracing the letters on the front to make a guide.

After I went over all of my letters, I think I could have skipped the scribbling step.  My pencil made a tiny indentation in the wood where I traced and it was more visible than the graphite transfer.

I set up my card table in front of the TV one evening after the kids were in bed and used my wood burning tool to go over all of my letters.  I love that thing.  It gives you a unique look that I can't achieve with any other product or tool and I think it's much easier than trying to hand paint the letters.


I picked up these railroad nails a while back without really knowing what I was going to do with them.  I just thought they looked intriguing with their embossed numbers showing the year they were used.  They turned out to be the perfect thing for this project.  I hammered two of them into my photo display to hold the jute twine for the photos.


Mini clothespins make it easy to switch out the photos seasonally or whenever we want to add something new.  I'm addicted to printing my Instagram photos from my Postal Pix app on my phone.  If you haven't tried it, you really should.  It's so easy and fun.


Wednesday, September 5, 2012

Vintage Door Headboard


I'd like to share my audition project for So You Think You're Crafty with you.  That's right, I'm competing in Season 13 of the weekly crafting competition.  The actual competition starts on September 10, so be sure to check in each week and vote for your favorite project.

I decided that it was time to whip our guest bedroom into shape.  We hadn't really done anything in there since we moved in.  It was acting as a holding ground for some furniture and other junk that didn't have a permanent home yet.  We had a queen mattress, box springs, and basic bed frame, so I decided to start with that.  We needed a fun headboard to set the tone for the room.


About two years ago, I ran across a Craigslist ad for a bunch of old doors.  The seller was asking $100, but there were about 40 doors.  Somehow, I convinced my husband that this was a good idea and he and my father in law drove a truck and trailer a hour away to pick up my treasures.  My LARGE stash of doors has been sitting in my parents' barn ever since.  I've used a couple of the doors here and there, but there are many projects still waiting to happen.  That winter (see the snow?), it was starting to warm up and I was getting the itch to get outside and work on  a project, so I started scraping the white paint off of this door.  I stuck it back in the barn and let it sit until now.

 Then a couple of months ago, my father in law tore out this old fence row.  When I started thinking about some kind of posts for my headboard, he scavenged a couple of the posts out of his trash pile for me.
 I cleaned up my door and removed any loose paint that was peeling off.  I gave it all a rough sanding, just to get any grimy parts off.  I removed the hardware to clean it and sealed the whole door with clear acrylic spray, to keep everything in place.  Then, I started laying out the posts to see where I wanted everything.

 After I got all my measurements down, I cut the posts to length and added a plastic nail-on furniture foot, just to keep it up off the carpet a little.

 I flipped the door over and used some metal brackets to screw the door headboard into the posts.

I set up my bed frame and got it ready for the headboard.

 Then, I found my cute helper who loves to use power tools.  :)

 With her help, I attached a scrap board towards the bottom of the posts.  My headboard was going to be wider than my bed frame, so I needed a place to attach the frame.

 I cut some blocks of wood to act as spacers and then screwed the frame into the board.  I added those blocks because I didn't want the frame and mattress to be too far under the door.  I was worried about my guests banging their heads on the headboard.

 Here she is, all ready to have the box springs and mattress put into place.

 Once it was all put together and the bed was made, I loved the bright pop of green even more.  The character of the door definitely shines through and I love that the fence posts found a new life instead of just going in the trash.

It's time to invite some out-of-town friends over!  This bed needs some weekend visitors!


I've linked up to these linky parties!  Go check them out!

Home Stories A2Z

Thursday, August 9, 2012

Back to School

It happened last week.  All three of my girls started school.  I was not as excited as they were.

 My twins started kindergarten this year.  All. day. long.

 They were eager and confident on their first day.  They are so ready!

However, I'm not sure that Preschool is ready for this little one.  Lily had a harder time starting preschool.  It's getting better, but it's pretty hard to be away from your mom for two mornings a week.  She'll be fine, but it's still not easy to leave your little one sobbing.

Right now, my house is too quiet.  Little sister asks if it's time to pick her big sisters up about twenty times a day.  I know we'll get used to this new routine, but change is hard sometimes!

Monday, July 23, 2012

Bedazzled Lunchboxes


My twins are starting kindergarten this year (sniff, sniff), so we have been gathering up school supplies and getting ready for the big day.  They actually start on August 1, so we're cramming all that we can into the last few days of summer.

We are using the Easy Lunchboxes system for packing their lunches from home.  While they do come in a variety of fun colors, my girls were still looking longingly at the lunchboxes with cartoon characters all over them.  So, I decided we could spiff up their lunchboxes a bit.

We started with the soft sided, insulated vinyl lunch box, the Mini BeDazzler tool (I got mine from Hobby Lobby with a coupon), and a washable fabric marker.

The girls decided to bedazzle their first initial on the top of the lunchbox.  Obviously, you could do any kind of design or simple outline picture.  I drew a simple letter with the fabric marker to use as a guide.
The twins decided to use a variety of colors of rhinestones, so I just eyeballed it and tried to space them evenly along my letter.

I had never used a Bedazzler before, but it was really very easy.  You just place the little cup shaped stick on the bottom side and line up your rhinestone, then give it a good push.  When I was finished, I just wiped the fabric marker off with a damp rag.  It came off super easy.

I was a little nervous about the thickness of the insulated fabric.  But, the rhinestones went right through to the other side.  You can see where the little "teeth" stick through and then get bent closed.  I was also unsure about poking holes in the lunchbox.  I though it might compromise the insulation factor.  After looking at the finished product, I don't think it's going to be a problem.  The holes are super tiny and you can't see any light around the rhinestones.


These two were VERY happy with their new blinged out lunchboxes.  I don't think they'll have any problems with getting their lunchboxes confused with a classmate's.   :)

Watch out kindergarten, here we come!


**Disclaimer: Easy Lunchboxes and BeDazzler have no idea who I am.  
I just happened to like their products and used them for this project.**

Friday, July 20, 2012

Isaac's Nursery

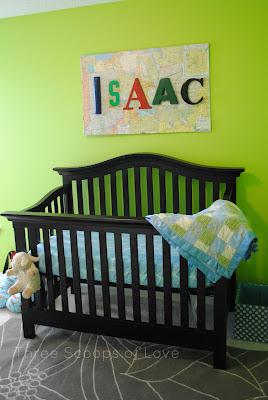
My nephew is here!  Isaac James arrived safely early in the morning on July 18.  He and his mama are doing well and everyone is getting settled into their new routine.  I was waiting to share a glimpse of his nursery until he had arrived.

At my sister-in-law's shower, we used these reclaimed sign letters to spell out Isaac's name on a pallet on the mantel.  After the shower was over, she took the letters to re-use in his nursery.


My brother and sister-in-law bought an atlas at a used book store and decoupaged some maps onto a piece of scrap plywood.  Then, they hung the letters on the board with small nails and securely hung the whole thing above his crib.

I love that it became even more personal with the addition of the map.  I also think that his name is showcased even more with the map board acting like a frame, instead of just hanging them directly on the wall.  So cute!

Tuesday, July 3, 2012

My Mom's Pasta Salad

I grew up with my mom making this pasta salad as one of her regular, go-to recipes.  It was sure to appear more frequently throughout the summer.  When I eat it today, I still think of her making a big bowl of it and sticking it in the fridge to be ready for a weekend cookout or family camping trip.

It's ridiculously easy.  Yet, whenever I take it somewhere, I know it will get compliments and people will ask for the recipe.  The secret is really the salad dressing.  You absolutely may NOT substitute any other kind of Italian dressing.  There just isn't another option for this salad. 

Ingredients:

12 oz. rainbow rotini pasta, cooked and drained
1 bottle of Newman's Own Family Recipe Italian Dressing (mandatory!!!)
approximately 6 cups of veggies and other ingredients cut into small pieces

Just throw it all together in a big bowl, give it a big stir, and you're ready to go!

Salad ingredient possibilities:
tomatoes
broccoli
cauliflower
carrots
celery
red onion
green onion
peppers
feta cheese
colby jack cheese
pepperoni
bacon
grilled chicken
mushrooms
artichoke hearts
chopped spinach

This salad is really great for cleaning out your fridge!  Every time I make it, the ingredients are a little different depending on what I have on hand.  If I know that I'm going to be making it, I'll always be sure to pick up grape tomatoes, broccoli, carrots, peppers, and red onion.  For me, those are the essentials.  But, you and your family may have different preferences, so make it your own. (Just don't switch the dressing!)

I also think it tastes better after it sits in the fridge overnight.  The noodles soak up some of the salad dressing and everything is more flavorful.  I always hope there will be some left for lunch the next day!

Sunday, July 1, 2012

Vintage Jewelry Cabinet Hardware

If you're like me, you have memories of playing dress up while wearing your grandma's jewelry and feeling oh-so-fancy.  I love watching my own girls play like this now.  Anything sparkly or glittery catches their eye and instantly becomes a treasure.  Our three girls (5 year old twins and a 3 year old) share a bedroom and bathroom in our house.  Their bathroom has been without cabinet hardware since we moved in December.  Since room is for three little girls, I figured there was no better place to experiment with some sparkly, vintage goodness for the hardware.


I started by collecting lots of vintage jewelry.  I had this project in mind for quite a while, so I've kept my eyes open for the right pieces.  I've bought some in lots on ebay and at garage sales.  When I was lucky enough to find it, the prices were generally much better at garage sales.  I used mostly brooches, but also some earrings and old rhinestone buttons.  I also purchased some reproductions from the Etsy seller Simply Sassy Source.  I chose to mainly use pieces that had clear stones and silver metal, but you would have a lot more choices if you used colored stones.


I used sharp pliers to cut the pinbacks and any extra hardware off the backs of the jewelry.  Watch out, they fly off!

You really want to get anything off that prevents you from having a semi-flat surface to attach the post.
After a lot of trial and error, I decided on using these threaded posts to create the actual handle of the hardware.  I got these at Lowe's in the pull out drawers in the hardware aisle.  They come in a wide variety of lengths.  I used 3/4" for mine.

Each little package comes with a threaded post and a small screw.  The screw will most likely not be long enough to use for this project.  Save those for another project. Each one of these cost $1.04 at my local Lowe's.

After experimenting with different types of "industrial" strength glue, I decided that epoxy was the way to go.  I wanted something that would give me as strong of a hold as possible.  I realize that three little girls will be putting some wear and tear on this hardware, so I won't be surprised if I have to make repairs in the future.

After mixing the epoxy, I loaded up the end of the threaded post with a dollop of epoxy.

I held each post in place for about a minute to let it set up a bit.  Then, I set them inside a shoebox lid to dry undisturbed.  The package instructions said to let the epoxy cure for an hour, but I went ahead and let them dry overnight, just to make sure.

Have you seen these nifty templates?  I picked mine up at Lowe's and it makes marking your holes for hardware a breeze.  I felt much more confident that my marks were lined up evenly when I used this guide.
I used an 11/64" drill bit to drill my holes in the drawer fronts and cabinet doors.

 I picked up these machine screws to fit into the threaded post and hold the hardware in place.  I used 2" long screws on the drawers and 1 1/4" long screws on the doors.

Most drawer fronts are thicker than cabinet doors due to the decorative front being applied to the drawer.
When you screw the threaded post onto the screw, you want to try to be careful that you're turning the post, not the jewelry piece.  I popped one loose by holding on to the jewelry instead of the threaded post when screwing it on.

 Now, these kinda boring cream cabinets have some pretty bling!

I used all different shapes and sizes in the girls' bathroom.  I wanted it to feel a little funky and mismatched.  Some are even broken and missing stones, but I think it adds to their charm.  Besides, I wouldn't want them to be too perfect.  I want little hands to be able to touch and admire the sparkles.

 My girls love them and each picked out a favorite for her own drawer.

If you end up making your own set of upcycled jewelry hardware, I'd love to see them!


If you're interested in having your own set of hardware, but don't want to take the time to make your own, head on over to I Am Momma, Hear Me Roar where you'll find this set of 8 drawer pulls/knobs that's up for auction. Cheri is hosting a charity auction series, For The Love, every Monday to raise money for a sweet little boy named Owen. Be sure to pay her a visit each Monday to see what's on the auction block!