Thursday, March 29, 2012

Snow White Party -- Cut Wood Vase Tutorial

I wanted to share a quick tutorial on this vase I made for our Snow White birthday party

The inspiration for the vase came from the wreath I made for our front door.  When I saw this one at diy kinda girl, I knew I had to have one of my own.  I made the wreath following her directions pretty closely.  I did use brown burlap instead of felt to cover my wreath form.  I added a little Happy Birthday banner out of scrapbook paper for the big day.  I loved my wreath so much when it was done that I wanted to make something coordinating for the inside.  I decided on a large vase that could hold some flowering branches from the yard.
 
Because I'm cheap, I didn't want to spend money on my base, so I started with two empty green bean cans.  These are the giant ones from Sam's Club.  I used the can opener to open up the bottom of one of the cans so that it was just an empty tube.

 I used black electrical tape (because that's what I could find) to hold them together once they were stacked on top of one another.

 Just like with the wreath, I wrapped the whole thing in brown burlap strips, secured with hot glue.

 I started gluing the wood discs on, thinking of it like a puzzle, large pieces first, then fill in with the smaller ones.
I just kept turning it around, filling in until I got close to the top.

I added some cut forsythia branches and it made for the perfect natural element to our dessert table.  I wouldn't fill the water past the top of the bottom can, just in case it's not water tight.  The vase itself is pretty heavy with all of that wood, so it could really hold some tall branches and make a large visual statement.

If you're interested in seeing the other details of our Snow White party, check these out:

Snow White Party -- The Queen's Table

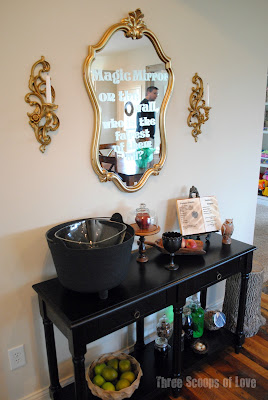
 When we first started planning Lily's Snow White birthday party, I knew we had to do something with the iconic mirror and that scary queen turned witch.
 On one of my trips to Goodwill, I spied this gold framed mirror whose curves spoke to me.  It seemed perfect for that evil queen's mirror.  While I was trying to dig it out from a pile of junk, an older lady came up and started asking me if I could get that mirror out for her!  I quickly explained that was what I was going for.  I uncovered my mirror quickly and got out of there.  The ugly plastic candle sconces were also a Goodwill find and I secured them up on the wall with some Command strips.

   
Once I made it home with my prized mirror, I cleaned it up and cut my words out of frosted glass vinyl on my Silhouette.  It was my first time working with vinyl in the Silhouette and it was harder than I expected!  My words could definitely have been applied straighter and the spacing could have been better, but Lily didn't seem to notice!

 
 I scooted a sofa table over underneath the mirror and candleholders and set it up like the queen's magic workshop.  We used a black plastic cauldron (from my mom's Halloween stash), a spell book on a really neat Goodwill easel or book holder, a wooden scoop full of apples, an owl figurine swiped from my grandma's house, a goblet from Goodwill that I spray painted, and a Goodwill cheese board and dome glued to a wooden candlestick to make a pedestal for that poison apple.  I'm telling you, this really could be called a Goodwill party.

Down below, I added a basket of apples, some glass jars filled with colored water to look like evil potions, a bird's nest, and empty jars.

 For the queen's spell book, I completely ripped off one I found through Pinterest at Polish the Stars, except hers is much better.  Seriously, go check it out.  Mine is the extremely quick version.  I typed up some text to look like a magic recipe or spell, printed it out, stuck it in the oven for a few minutes, and then used double sided tape to stick it inside an old book that was missing some pages.


Once the party got started, we added dry ice to the cauldron for a spooky effect.  We added hot water to the dry ice and the fog started flowing.  Unfortunately, so did the water.  The black plastic cauldron turned out to have a leak.  After it was cleaned up, we switched to a black stockpot and we were good to go.  :)

If you'd like to see more of the Snow White birthday party, check out these posts:

Wednesday, March 28, 2012

Snow White Party -- Banners and Buntings

To add plenty of visual interest and pop, I added several buntings around our house for Lily's Snow White Birthday Party.  I got my inspiration from Kirstin's book page buntings from her fabulous showers at kojo designs. 

 I searched high and low at the thrift stores looking for an old Snow White picture book.  I think I found every Disney story except Snow White.  I found one pretty inexpensively on ebay.  I picked out the pages with the largest pictures, trimmed them down to the same size, and glued them onto some pom pom trim.  I also used a Martha Stewart punch from Michael's to make some lace edges on the bottom of the pages.
 I added some little mushroom birds from Hobby Lobby up in the corners to make it look like the birds were holding the bunting up.  I hung the bunting with a tiny finish nail and just used the metal clip on the bottom of the bird to clip it onto the nail.

 After making the large book page bunting, I took the leftover pages and cut out smaller pictures with two different sizes of circle punches.  Then, I just ran them through the sewing machine and stitched them all together to make a little banner to hang over the cake.

 For a super quick project, I quickly cut out some triangles from fabric scraps and burlap and hot glued them to some jute.  I didn't even measure the space between triangles, just glued them and hung it up!


If you'd like to read about the other details of our Snow White birthday party, check these out:

Tuesday, March 27, 2012

Snow White Party Invitation


If you missed my overview of my youngest daughter's Snow White themed birthday party, check it out here.  I wanted to revisit some of the details that made the party such a success.

For her party invitation, I decided to try my hand at some fancy schmancy chalkboard lettering.  I borrowed my mom's framed chalkboard that hangs in her hallway for the job.  I knew it would be big enough that Lily could sit in front of it and I could get her and all of the text in the photo without getting the wood frame.

I played around in Microsoft Word and printed off my text in the size I wanted.  I laid it out on the chalkboard to get a rough idea of placement.  Then, I took a piece of chalk and rubbed all over the back of the paper.  I carefully laid the paper back on the chalkboard and went over the letters with a pencil.  This gave me a VERY light outline of chalk left on the chalkboard.  I then went over my guidelines with a chalk marker to get a more definite line.

When I was done, I cleaned up a few smudges with a damp paper towel.  Then, I propped the chalkboard up next to a window and sat Little Miss Princess in front of the negative space next to the letters.  I made sure to place a piece of white posterboard next to her, opposite the window, to act as a reflector.

I gave her an apple and let her big sisters stand behind me and make her giggle.  I did some basic cropping and added a simple frame and it was done!  I printed them out as 5x7 photos and stuck them in a red envelope.  Done!

Tag, I'm it!

I'm sure you've seen the blogger tagging games around the blogosphere, so when Marilyn of 4 You With Love tagged me, I thought I'd play along.  Marilyn is a fellow Midwestern gal and you just have to check out her paper bag floors when you get a chance.  Fabulous!

I'd like to start off by sending the game along to 11 other fun bloggers who have left me some kind comments.  I still feel kind of new to this whole blogging thing, so their positive comments have been a great encouragement to me.  Be sure to check out their blogs!

1. Sara from Sweet Little Gals
2. Claire from Bless My Nest
3. Deanne from Crafter Meets Craftsman
4. Kerri from A Pop of Pretty
5. Stacey from Embracing Change
6. Amy from A Snip of Goodness
7. Amanda from Serenity Now
8. Elisa from Home Sweet Nest
9. Gabby from The ...Late, Young Family
10. Lauren from Our Hiding Place
11. Jen from Fishsticks and Tiddlywinks

Ok, ladies, here are your 11 questions!

1. What is your all time favorite meal?
2. What is something embarrassing or funny that has happened to you lately?
3. Do you have kids or pets?
4. What do you think is the best thing about blogging?
5. What is your favorite vacation destination?
6. What is one thing you're looking forward to this summer?
7. Do you have a favorite quote or verse?
8. What was your first car?
9. Would you rather read a book or watch a movie?
10. What is your favorite thing to wear?
11. What is one thing we would always be able to find in your purse?

I can't wait to read their answers!


Here are my answers to Marilyn's questions:

1.  What was your favorite childhood toy?  I loved playing with my Strawberry Shortcake dolls.  It makes me feel old that they've brought them back and my daughters now play with them!
2.  How many children were in your family and what is your birth order?  There were three of us in our family growing up.  I am the oldest and I have two younger brothers.  We are each about four years apart.
3.  If you are married or seeing someone seriously, how did you meet them and what attracted you to them?  I think I've just known my husband forever.  Our families were connected when we were very young and we went to school together.  The thing that first attracted me to my husband was his maturity.  Long story short -- when we were about 14, some classmates were laughing and being silly about a guy and girl who "liked" each other.  When I witnessed his reaction of an eye roll and ignoring them, his intolerance for their immaturity really struck me.  I admired him from afar for the next couple of years until we started dating.
4.  What do you do when you are not blogging? I'm usually running after my three little girls! We just moved into a new house, so I'm still finishing up little projects here and there.  We're getting ready for a big garden this year and we're expecting some new chicks at the end of May.
5.  Do  you  do any volunteering and if so what/where?  I volunteer fairly often at my twins' school.
6.  What is your favorite activity that you blog about (cooking, sewing, knitting, painting, remodeling, etc)?  I love to blog about my crafting or building projects.  Anything that involves paint and maybe some power tools is right up my alley.  I love to make something with the hope that it will inspire someone else to make something, too.
7.  What is your favorite childhood memory? Gosh, I have a lot.  I used to spend the summers with my family traveling around to horse shows.  We would spend long weekends in the motor home, surrounded by our friends and horses.
8.  Who is your (fantasy) dream guy?  I would have to go with Ryan Gosling, but only the fantasy "Hey Girl" version who frequents Pinterest.  Those crack me up every time!
9.  What is the "creating/crafting" skill your mom/grandmother taught you and you always think of them whenever you make something with this medium?  Anytime I embroider, I think of my grandma.  I don't remember how old I was, but I will always remember sitting on her couch in the basement with a piece of muslin stretched in a tiny embroidery hoop.  She had written my name with a pencil and after many mistakes, I finally got the thread to cover those letters.
10.  Where do you see your blog 12 months from today? Hmmm, I hope to continue to expand and reach a larger audience.  I also hope that I'm feeling even more comfortable with the technical side of things.  Right now, that's still intimidating to me.
11.  Who is your idol? My mom!  Whenever my girls are testing my patience, I try to remember the fun things she did with us.  I can't ever remember my mom telling me "No." (within reason, of course!)  Anytime I wanted to start a project, she would let me learn from my trials and errors.  She taught me to not be afraid of power tools and she's still the first person that I call when I have an idea for a project, but can't quite figure out my plan of attack.

Thanks for reading and playing along!

A Snow White Birthday Party

My youngest daughter LOVES Snow White.  With two older sisters, she was forced into the princess craze at an early age, but she has always been loyal to Snow White.  Last year, she shared a birthday party with her sisters, as their birthday is only two weeks away.  This year, she got her very own party and, of course, chose a Snow White theme.

I tried to make it a bit less commercialized and go more with a woodland or nature theme thrown in with Snow White.  Honestly, this could probably be called a Goodwill Snow White party because the vast majority of our decorations came from the thrift store, if it wasn't something we didn't already have.

I'll share a bunch of pictures and then check back in with some of the details and how-to.


Our 3 year old Snow White loved her party and was delighted at all of the little touches!  Her big sisters loved helping out with the planning and decorating.  I'll check back in tomorrow with some of the details on how we pulled it all off.


Read about more of the party here:

Monday, March 26, 2012

Pipe Fitted


Last week, I shared my Powder Bathroom Reveal and you could see my towel bar made out of plumbing pipe and parts.  I wanted to quickly share how these were put together.


It really couldn't have been much easier.  We just took some rough measurements in the bathroom to get an idea of an approximate size for the pieces.  Then, we went to Home Depot and scoped out the plumbing aisle.  We knew we needed flanges for attaching to the wall, then we just got some straight pieces that would work for the length and depth.  We bought three 90 degree turn pieces for the "corners" and a screw on cap for the toilet paper holder.

We ended up getting a combination of black pipe and galvanized pipe to get the sizes we wanted, so I gave them both a coat of flat black paint once they were all screwed together.


They're sturdy, functional, and fit very well with our industrial/upcycled/funky/farmhouse vibe.

I have a much larger house project that used the same plumbing pipe, but I need to get some good photos before I share that.  Just trying to keep you on the edge of your seats!  :)

Wednesday, March 21, 2012

Garden Gate Sign Tutorial


I was going through my Pinterest boards and found this pin from quite a while ago. I really liked the quote and wanted to use it on my own sign.  I'm not sure of the original source of the quote.  Anyone happen to know?
 

 I started with seven rough wood fence pickets from Home Depot.  They were a little over $1 each.  I gave them a rough sanding and enlisted my three favorite helpers to paint.  I turned them loose with the acrylic craft paint and told them to paint each one a Spring-y color.


Keep in mind that these have a very rough paint job.  I left them exactly the way and four year olds and two year old did it.


Once they were dry, we gave them a coat of antique white.


Then my helpers happily distressed them with hammers and screwdrivers.  I also sanded the super rough spots and the edges at this point so that some of the color would peek through.

I didn't take a picture, but I also cut two strips of scrap wood and nailed them across the front to hold everything together.
 

I played with the quote in some different fonts and printed it out big once I found what I wanted.  I laid it all out on the table to get my spacing right.
 

I used the old fashioned carbon paper substitute of scribbling on the back of the paper with pencil and then tracing on the front with a pen.


It gave me enough of a line to get an idea of where my letters should be placed.


 I used acrylic craft paint that was very watered down and just filled in my letters.  Once it dried a bit, I went back and added some more color here and there until I liked it.  I had some trouble getting the yellow letters to show up once it was up on the mantel, so I ended up outlining the yellow letters with a yellowish orange Sharpie.  You don't really notice the outline, but it made a big difference on being able to read the words.


 It's now the centerpiece of my Spring mantel.  It helped to lighten up the space and I love that my girls were able to help with the project!

Tuesday, March 20, 2012

Spring Mantel

 Our mantel needed some lightening and brightening for Spring.  I ditched all of the previous decor and started fresh, just like Spring.


 From left to right we have:
- an old chicken feeder to remind us of our chicks that will be arriving in May
- my handpainted garden gate sign (tutorial to come tomorrow!)
- a sweet little bunny
- some paper pinwheels stuck in a rusty yellow sap bucket
- a pot of daffodils on top of an old wooden box


Combine a new mantelscape with this beautiful warm weather we're having in Indiana, and I'm ready to go outside and get my garden planted!

Be sure to go check out all of the beautiful Spring mantels at Layla's Spring Fling link party!

The Lettered Cottage