Showing posts with label barn wood. Show all posts

Wednesday, June 27, 2012

Barnwood American Flag


I wanted some patriotic decor for our mantel for the rapidly approaching Fourth of July holiday.  So, I went out to our pile of leftover barn wood that we used for our house siding and dug out some red and white painted pieces.  I cut a few pieces to the same length and scraped off any big chunks of peeling paint.
 
I attached some scrap pieces of plywood to the back to hold it all together.

I printed out a large star shape to use as a pattern and began hammering small nails around the outline of the star.  When finished, I ripped the paper away and was left with tiny nails that I didn't hammer all the way in.

 I used some navy blue yarn and tied one end onto a nail at one of the points of the star.

I kept wrapping the yarn from nail to nail, keeping the tension fairly tight on my yarn.  I found that it helped to wrap the yarn all the way around each nail, to keep it from slipping off.  When I was happy with my star shape, I went around the outside line one more time and connect all of the nails with my yarn before tying it off.

I set my primitive version of an American flag up on the mantel and our living room was ready to celebrate the Fourth!  I added a large star that I made by cutting some branches to the same length, then tying them together with twine. A stack of books, some glass jars, and an old bowling pin finished it off.

Tomorrow, I'll show you my little banner I made on the front of the mantel out of old bottlecaps.

I'll be linking up to the following parties:
 
Home Stories A2Z

Friday, March 9, 2012

Reclaimed Wood Shelves


After moving in and living with our kitchen for a few weeks, it was time to start adding on some fun stuff.  This small corner space between the fridge and the wall was looking a little bare, so we decided to add some shelving to hold our drinking glasses and cookbooks.  I should say, our most used cookbooks.  The rest are in the cabinet above the fridge.  I think they multiply at night.

This old red barn resides on my in-laws' property and it's the first thing you see when you turn on our driveway.  It serves as the landmark for helping people to find our house for the first time.

Side story:  Ryan and I both have fond memories of this barn and little pasture.  When we were kids, long before Ryan's parents owned this property, a farmer lived here and had several goats.  We each had grandparents who lived further down this road and they would bring us, our siblings, and our cousins down to visit the goats frequently.   We each have our own stories about carrying a bag full of carrots down the road to feed the goats.  Never in a million years did I imagine that I would one day be living by the goat barn.

A couple of years ago, my father in law filled in the basement of the aging barn.  They removed the old wood floor and filled it in with gravel.  Luckily, my husband and father in law saved those wonderfully worn boards which would now make perfect kitchen shelves.  :)


Here's the thick, heavy floorboard in our garage waiting to be cut. We cut the boards to length, so that they would fit fairly flush between the fridge cabinet and the wall and then cleaned the grime off.

We attached these metal shelf brackets from Anthropologie, which are unfortunately no longer available.  Thanks to a Chicago store for sending us the last of theirs!

 
 And, voila, reclaimed wood shelving!
 

It adds some functionality and much needed interest to this corner.


 A little rustic, a little industrial, and a big smile from me.

Thursday, March 1, 2012

A Countertop for my Pantry


After moving in and getting settled in our house, our plans were to use some of the leftover Richlite from our kitchen countertops to cut a small countertop for our pantry.  Well, it didn't quite go as planned and we ended up not having a big enough piece for the pantry.


We planned on using this small cabinet space in the pantry as an extra workspace.  I wanted a work surface that could be out of sight if we were having a party or something.  The space was roughly 24"x36".  We thought about just going to Lowe's and ordering a small laminate top, but I then I thought about all of the leftover wood flooring we had from the rest of the kitchen, dining, and entry area.  I figured it was worth a shot to make a rustic countertop out of the reclaimed barn flooring.  After all, it wasn't going to be a high traffic area, there's not a sink involved, and it was already paid for.  I figured that if it doesn't work, I can always replace it with a laminate countertop in the future.


I cut my boards to length and made sure they were all even.   I sanded everything at this point before it was put together.  The reclaimed barn flooring is very uneven, so it's easier to sand it in pieces.  I used the tongue and grooves edges to snap it all together.  For my edge trim pieces, I cut some of the boards down in width and mitered the corners.


I lugged the whole thing over to my parents' house where my dad helped me secure it all together with his nail gun.


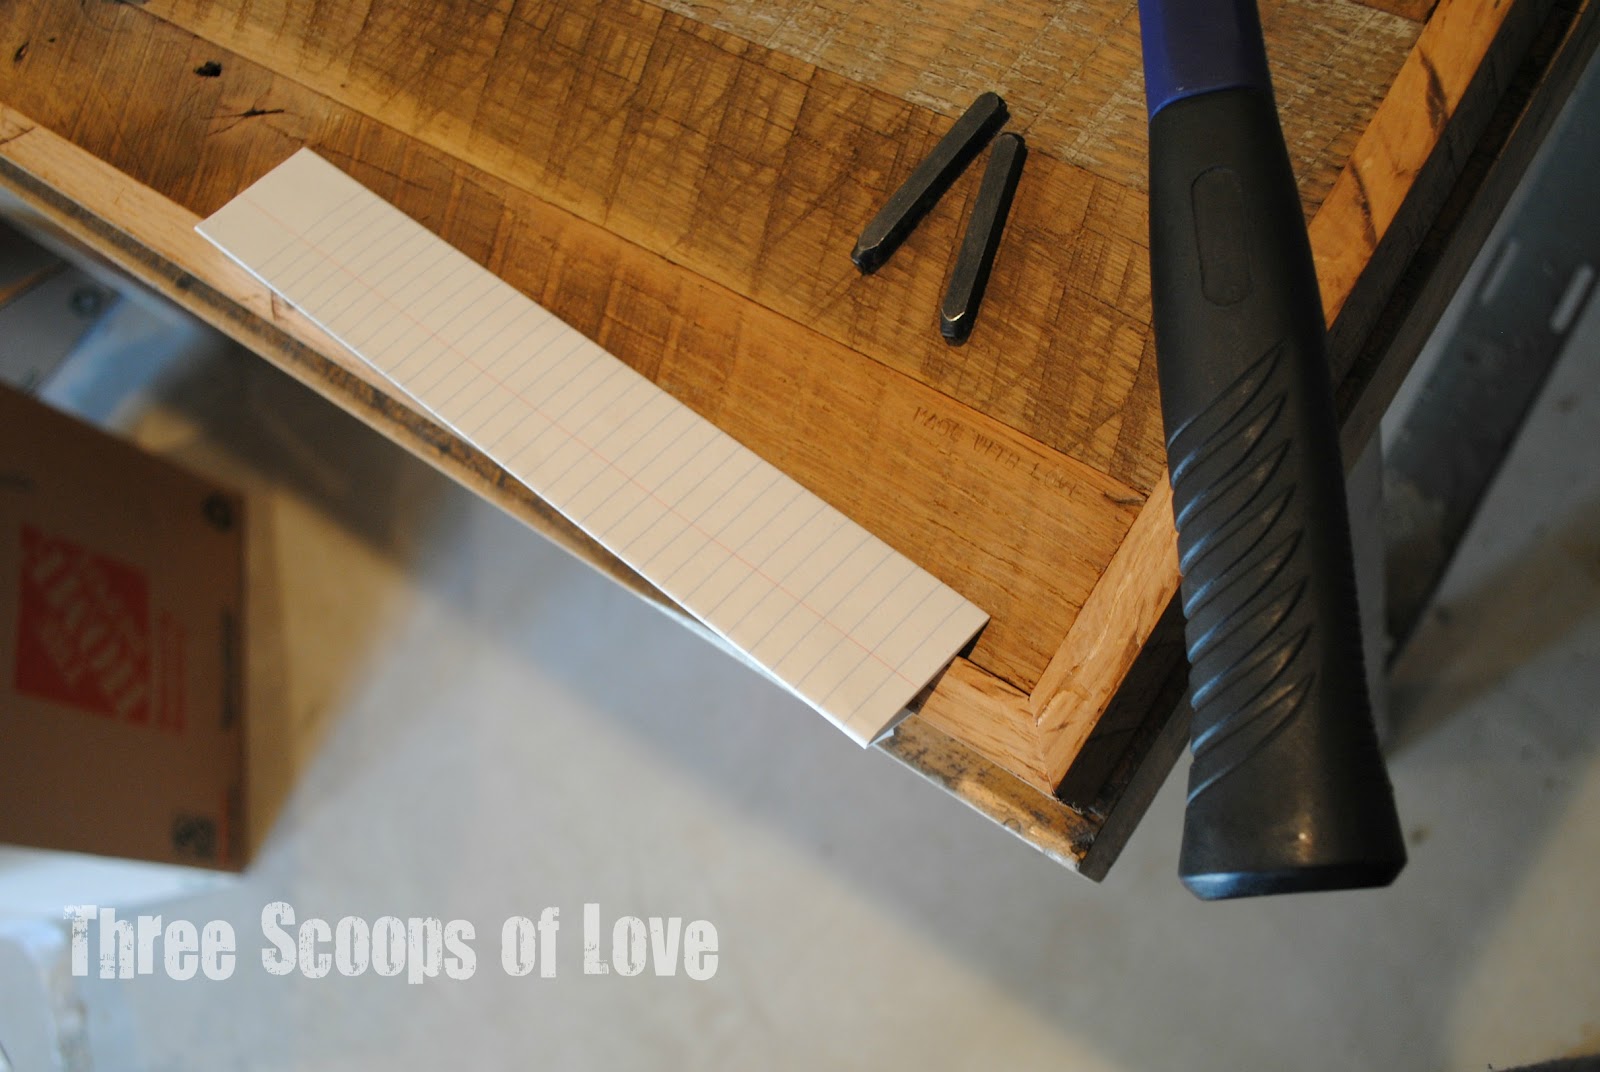
Soon after this, I was perusing Pinterest when I ran across an idea from 3 Sun Kissed Boys to use jewelry stamps on wood.  I pulled out a scrap piece of barn wood flooring and started experimenting with my jewelry stamps.  I was really hoping to use one of my typewriter style fonts, but they were just too small.  The letters got lost once I polyurethaned over them.  So, I ended up using one of my larger stamp sets.  Wood stamps a lot different than metal!  You don't have it hit it as hard and you definitely only want to hit each letter once.

I wanted to make sure that I got a fairly straight line for my quote, so I folded up a piece of paper to use as a guide.  I would definitely recommend writing your quote or words down on a piece of paper.  I was aligning my quote to the right, so I actually stamped it backwards, starting with the last letter of each word.  When you're staring at those letters for a while, they can start to look wonky and all wrong, so it's helpful to have it written down.


For my stamping, I chose "Everything tastes better when it's made with love."  I thought it was fitting for our pantry because I'll see it when I really don't want to take the time to make something from scratch.  As I was stamping the words, I kept thinking about one of the first times I came home from college my freshman year and my mom's green beans tasted like the best food I had ever eaten.  It's sad that it took some cafeteria food to make me appreciate my mom's effort.

After I stamped my words, I gave the whole thing a coat of floor polyurethane (because that's what I had on hand).  I then took an Ultra Fine black Sharpie and lightly went over the letters once the polyurethane was dry.  I added another coat of poly and touched up my letters once it was dry.  The stamping doesn't jump out at you.  It's still very small and most people won't even realize it's there, but it's a quiet reminder for me of one of my priorities.  I've already seen my girls running their fingers over the letters


Ta-da! A countertop for my pantry using things that I already had. It always makes your project sweeter when you don't have to spend money on it!

Tuesday, January 17, 2012

Reclaimed Barn Siding

Once we started bringing our beautiful barn wood home, it was time to figure out how to actually make it work on the exterior of our house.  Luckily, our framers were willing to work with us and our unconventional ideas.


They started cutting pieces of scrap wood and sticking them up for us to see.  We tried out a couple of different ways before we decided to do a combination of natural brown and the faded red.  In the previous post, I told you that all of the exterior boards had been painted a bright red more recently.  Luckily, the interior side of those boards had not been painted, so we could just flip those boards around and use the backside as the "good" side that would be showing. The boards were finished with a tongue and groove edge that allowed them to fit together nicely, no matter what side we wanted to show.


We asked the guys to use the different colored boards as randomly as possible, so it wouldn't look like we were making a pattern with the different colors.  It was a lot of work for the framers.  There was a LOT of trimming off damaged end pieces that they wouldn't have to deal with on new materials.  They were troopers and in the end, they agreed that it was worth it.


I can't wait to show you pictures of the completed exterior.  Maybe in a few months we'll even get some grass growing around here!

We Bought a Barn

From the very beginning of our home building experience, we had a very clear vision of what we wanted.  Luckily, Ryan and I were (for the most part) on the same page on the house decisions.  We knew we wanted to use a lot of reclaimed and salvaged materials, and when those were not available, we wanted to use local products as much as possible.

The idea surfaced very early on that we wanted the house to look like an old barn that had been added on to and converted to a home.  We played around with that idea in many different incarnations and tried to express that desire to our architect when forming the plans for the house.

We started keeping our eyes open for local barns that were falling down or in disrepair.  We put the word out to local farmers and friends of friends that we were in the market to buy a large amount of reclaimed barn wood.  We perused Craigslist and the classified ads in the newspaper.  We went on many "adventures" to scope out possibilities, but it seemed like we could never find the right one.  We determined that the amount of wood we would need was going to be quite a bit larger than most of the structures we were looking at.  Especially since many of them were already falling down and not all of the wood was usable due to prior damage.

It's fairly easy to find barnwood for a project like this, but we were being rather picky.  Many had been repainted too recently and didn't have the patina we were looking for.  Others were an odd color or the wood was not in good shape.  We found several that seemed perfect, but the price was too high for us.

We toyed with the idea of buying a barn and tearing it down ourselves, but ultimately decided that it would be worth it to hire a professional for the job.  We found a company with a location in Indiana that sells reclaimed wood for building projects.  We made the two hour trip to their office and checked it out.  The wood was beautiful, but it was expensive.  Ultimately, we decided that wasn't for us.  We then got in touch with a team of college students who tear down barns during the summer and resell the wood.  They gave us a couple of options to go look at.


At first glance, we weren't too keen on this barn.  The red paint looked too new.  It didn't have that time worn look that I wanted.


But, it was BIG.  This was a much larger barn than we'd seen before.  My cell phone pictures don't really capture it, but it was very tall and had a large side section that had been added on at some point.  The original structure was built in the 1890's and the inside wood was exactly what I wanted.  It had a beautiful worn finish and the old exterior was a faded red with beautiful wood peeking through.

The barn had sustained storm damage and it was going to cost over $50,000 to have it fixed properly.  The owners were instead choosing to have it torn down.  After doing a lot of measuring and figuring, we agreed to buy the barn, hoping that we could use all of the inside pieces to achieve what we wanted.  We also wanted the beams inside the barn to use in our house.


Here's what she looked like with about 75% of the wood taken off.  We ended up making multiple trips to go get the wood and bring it to the building site.  Our framers were ready to start working on the exterior before the barn was completely down, so we would take a trailer an hour north to the barn, load it up, and bring it back to the house so they could work while the rest was coming down.

Watching the tired, injured barn being transformed into something new was even more magical than I expected!