Friday, August 19, 2011

Back to School Hairclips


I don't know about you, but it's always so exciting to me when we get to shop for school supplies.  I love seeing all of the new pencils and crayons, fresh and ready for a new school year.  My oldest daughters are in preschool this year and they really enjoyed their back to school shopping.  They also love rainbows and everything ROYGBIV order, so I thought we'd combine the two when we were making some new hair accessories to go with new school clothes.

Start with some colored pencils, either new or used.  We choose six in rainbow colors.  I used a band saw to chop off the sharpened ends of the pencils.  I cut mine 1 1/2" long.

They will probably be a bit rough, so use a sanding block or sandpaper to smooth out the cut edge.


If you want to make more than one hair clip, use a pencil sharpener to re-sharpen the leftover pencil that you cut.  Now, just cut off another 1 1/2" section for your next hair clip.  I made three of these for my three girls and I only had to use one set of colored pencils. 


Line up your colored pencils, glue them onto a strip of felt, then glue onto a ribbon covered alligator clip.


You could also easily attach it to a headband.

But beware, these are very tempting to little hands!  It didn't take long for them to figure out they could use them to draw perfect rainbows!  :)


Wednesday, August 10, 2011

Tree of Love Necklace

I am so very excited to introduce my newest piece of jewelry.  The Tree of Love necklace is extra special to me because this is the first truly custom piece I have ever made.  Before, all of my jewelry has been made with stamps that anyone could purchase.  For this particular piece, I commissioned a gentleman to make a custom stamp for me from my own artwork.  Now, I can offer an exclusive design to my customers.

Like the rest of my jewelry, this one is completely customizable.  Add some initials, or even a name, like a sweet inscription that you find on a tree that's been there for years. 

Having it on a necklace is much better, of course, so you won't be harming any trees. :)

If you get a chance, check out the Tree of Love necklace, along with my other pieces, in my Etsy shop, Three Scoops of Love.

Sunday, August 7, 2011

Nautical Flag Banner


A few months ago, I was browsing through the Land of Nod catalog and I saw these. My wheels starting turning and I figured I could make my own version pretty easily. Even though they are shown in a boy's bedroom and I don't have any boys of my own, I thought they would even be nice for some coastal summertime decor.

If you search for "nautical flag alphabet", you'll find a zillion hits that will show you the symbols for the alphabet that are used on nautical flags. I happened to use this one. I decided to spell out our last name, with the plan to display it on the mantel or in the playroom.

I didn't want to buy anything special for this project, so I used only things that I had on hand.


I started with a bolt of unbleached cotton muslin that my grandma had given me from her stash. I cut rectangles that were approximately 9 1/2" wide and 15" tall. I figured that I wanted the finished flags to be about 12" tall, so I left enough room at the top for folding it over the rope.

I should also mention that I wanted these to look a little messy. I wasn't worried about fraying edges or imperfectly straight lines. I was hoping all of that would add to the character and make them vintage and a little worn.


I marked off the top edge with painter's tape and started sloppily applying my colors in acrylic craft paint. Remember, I wanted it to look rough. I didn't have all of the exact colors I needed, so some not-so-precise color mixing occurred to get some colors that would work.


I continued with my painter's tape, making the patterns and symbols to spell out our last name. For the letter "I", I used a drinking glass to trace a circle and then hand painted the circle. If you're looking at the symbol chart, you may notice that the circle on the "I" symbol should be black. I was bummed out when I planned out my last name and saw that I was only using white, blue, and yellow. I wanted some red in there, so I just used red on this one. :)


Wait for your paint to dry, peel your tape off, and admire your new nautical flags!


Lay out your letters and decide how far apart you want them to be. I also tied small knots on either side of each flag, just for an extra little somethin' somethin'. I ran a small line of hot glue along my twine and folded the top of the muslin over. Of course, you could sew it or do something fancier, but I was trying to keep it simple.

Make sure you leave plenty of length on your rope or twine for tying the ends onto something!
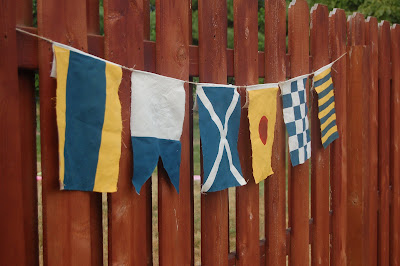
I think this would be super cute in a kid's room, spelling out his or her name. You could also use it for a birthday party or nautical themed shower. It looks like there are also flag symbols for numbers, so you could do a birthdate or wedding date as well. It's kind of fun to think that not everyone would know what the "hidden" message is!

Any other good ideas for how to use this super easy project?

Friday, August 5, 2011

InstaFriday

I'm linking up at Life Rearranged to share some of the highlights of my week.

---------------------------------------


1. This big pile of scrap wood is just calling my name. You know there are a ton of projects just waiting in there!


2. Miss Maddie all snuggled up so sweet.


3. My sweet husband hauling home some treasures from an auction for me.


4. Yummy caprese skewers made by my four year olds.


---------------------------------------

How about you? How was your week? Do you have big plans for the weekend?

Thursday, August 4, 2011

Spumoni Pie

One of my husband's favorite desserts is spumoni ice cream. He's always excited to see it on the menu at Italian restaurants. We decided to make a variation and turn it into a pudding pie.


Ingredients:

chocolate graham cracker crust
half of a small tub of Cool Whip
box of instant pistachio pudding
box of instant chocolate pudding
4 oz. softened cream cheese
1 t. cherry Jello dry powder
1/3 c. chopped maraschino cherries
1/2 t. almond extract
3 c. milk

1. Mix 1 1/2 c. milk with the box of pistachio pudding. Spread it into the crust as your bottom layer. Place in the refrigerator while you work on the next layer.

2. Mix the cream cheese, cherry Jello, almond extract, maraschino cherries, and Cool Whip together. Spread into the crust as your middle layer. Return to refr
igerator.


3. Mix the chocolate pudding mix and remaining 1 1/2 c. milk together. Spread on top as the final layer. Optional: chop up some chocolate chips or pistachios to garnish the top. Allow to chill for at least one hour.


Yum! Let me know if you try it out!


Monday, August 1, 2011

From The Ground Up

Our family is currently in the process of building a new home. When I say "our family", I don't just mean the husband, kids, and myself. It is truly turning out to be a big group effort. Of course, we're trying to do as much ourselves as possible to save money. But, all of the behind the scenes work has required LOTS of extra babysitting from our family members. We are so grateful for all of their help!

The girls eagerly participated in a little groundbreaking ceremony for us!

And then, some real dirt was dug! My father in law has spent countless hours working on the excavation for our house.


We're now in the midst of framing and making more decisions than I ever thought was possible. It's been a lot of fun and made me really appreciate my husband. It makes life a lot easier when we typically agree on selections and have similar attitudes towards life in our new house.


The girls are showing off their new playroom. They're pretty excited about the whole thing and are anxious to see their new room!

Let's be honest, we're ALL pretty excited about the whole thing! :)

Friday, July 29, 2011

Grandpa's Little Helpers


Have you ever tried to find a "girly" bulldozer shirt? They don't exist! Imagine that! My father in law and husband are in the construction business, so my girls are rather obsessed with bulldozers, dump trucks, and the like. They climb up on a machine every chance they get.

I decided to use my Silhouette and the tried and true freezer paper method to make them some bulldozer themed shirts that were a little more girly than the options at the store. I'm sure you're familiar with this method. If not, google "freezer paper stencil" and you'll find a bazillion tutorials.

I love Tulip Soft fabric paint in matte finish. It always turns out good! My local Jo-Ann is upgrading to a larger location, so I recently scored a bunch of new colors of paint at 75% off. Score!

My Silhouette made cutting out the intricate design easy. I used the font Cheri Liney for the text. I will admit, getting all of those tiny pieces was pretty tedious. I ended up using tweezers, although I'm pretty sure you can get a special tool from Silhouette for that job.


I ironed the stencil on and started dabbing away with my paint.

I ended up using about three coats, since I was using lighter paint on a darker color shirt.


Ta-da! I got these particular shirts at Walmart. I think they were $3.50 each and they had coordinating skirts. Can't beat that! Plus, I love the fact that they're wearing a ruffly, flowery skirt with a pink bulldozer shirt. :) And most importantly, the girls love them! They couldn't wait to show Grandpa.